Showing posts with label linux. Show all posts
Showing posts with label linux. Show all posts
Tuesday, June 27, 2017
PDF Split and Merge Utility for Ubuntu Linux PDF Sam
PDF Split and Merge Utility for Ubuntu Linux PDF Sam
If you deal with a lot of PDF files under Ubuntu and all you want is nothing but to extract certain pages... then you dont need PDF Sam, PDFMod should do it for you. But if you want more control over your PDF documents (meaning both split and merging with advanced features) then PDF Sam is a pretty good utility.
PDF Sam is an open source application written in Java and needs the Java virtual environment to run. It comes with two versions (both open source). One version is completely free (the one that Im using) but for the commercial version (they called it enhanced version), for that youll have to pay some fee.
Theres no "fee limits", even a single dollar will do it! OR you can download the enhanced versionss source code and compile it for free as well.
 |
| Not the best looking GUI... but it gets the job done!... |
Main features...
*. Split PDF files with following options (few to mention):

Split the source file into single pages, manually define the starting page, split after a certain pages (1/2/ any page numbers) or use bookmarks as split points, change the output file meta data (Acrobat 6/7/8 or use the source meta data), change the output file location, etc.
You can add more than one PDF file to the list.
*. Merge is pretty simple actually.

You just locate/add your files to the list and then change few settings such as the above mentioned meta-data version, destination (enable "PDF documents contain forms" option if needed) and hit the "Run" button.
*. Play alert sounds (dont think it worked in my Ubuntu 11.04 though).
*. Few languages supported.
Although default GUI is pretty darn ugly :D, I changed it using the "Settings" section (youll have to re-start the app to apply the changes) and after that PDF Sam used the default GTK theme (an older version of the GTK actually) and it looked much nicer afterward.
You can install PDF Sam in Ubuntu 11.04 Natty Narwhal (perhaps in 10.10 and 10.04) by using the below command in your Terminal window.
sudo apt-get install pdfsamThats it.
Go to link Download

Saturday, June 17, 2017
PART 3 PERINTAH PERINTAH DASAR LINUX BESERTA PENJELASAN DAN CARA PEMAKAIAN LENGKAPNYA
PART 3 PERINTAH PERINTAH DASAR LINUX BESERTA PENJELASAN DAN CARA PEMAKAIAN LENGKAPNYA
- Perintah “smbclient”
Untuk melihat file apa saja yang di share oleh suatu host pada jaringan, dapat menggunakan perintah smbclient, penggunakanya seperti berikut :
root@hhan:~# smbclient -L 192.168.0.11
Password:
Domain=[kakashi] OS=[Windows 5.1] Server=[Windows 2000 LAN Manager]
Sharename Type Comment
--------- ---- -------
E$ Disk Default share
IPC$ IPC Remote IPC
D$ Disk Default share
print$ Disk Printer Drivers
I$ Disk Default share
G$ Disk Default share
F$ Disk Default share
Softwares Disk
ADMIN$ Disk Remote Admin
H$ Disk Default share
C$ Disk Default share
Anime Disk
session request to 192.168.0.11 failed (Called name not present)
session request to 192 failed (Called name not present)
Domain=[ kakashi] OS=[Windows 5.1] Server=[Windows 2000 LAN Manager]
Dengan perintah seperti diatas akan didapatkan list dari file yang di share oleh host dengan IP 192.168.0.11 seperti diatas. Dari hasil diatas terlihat bahwa host dengan IP 192.168.0.11 memiliki domain dengan nama kakashi, OS windows, dan server windows 2000 LAN Manager, dengan 12 file yang disharing dimana dari kedua belas file yang disharing tersebut 10 diantaranya merupkan file sharing yang di hidden dan merupakan file sharing default dari windows.
- Perintah “mv”
Perintah mv digunakan untuk memindahkan file dari satu lokasi ke lokasi yang lain. Bila argumen yang kedua berupa sebuah direktori maka mv akan memindahkan file ke direktori tersebut. Bila kedua argumen berupa file maka nama file pertama akan menimpa file kedua.
- Perintah “locate” dan “updatedb”
Fungsi dari perintah locate sama dengan fungsi dari perintah find, tetapi locate membutuhkan waktu yang lebih cepat dari pada perintah find dalam mencari sebuah file, karena perintah locate akan hanya akan mencari pada index. Penggunakan dari perintah locate adalah seperti berikut.
root@hhan# locate
Pada saat terjadi perubahan struktur directory pada linux anda, sebelum menggunakan perintah locate kita harus terlebih dahulu memperbarui file index-nya dengan perintah updatedb seperti berikut.
root@hhan# updatedb
- Perintah “alias”
Dengan menggunakan perintah alias, perintah – perintah yang panjang ataupun kurang familiar di telinga kita, kita dapat menggantikanya sesuai keinginan kita. Misalnya perintah “ls –alt” (tanpa tanda kutip), dapat kita ubah menjadi “daftar” dan sebagainya. Perintahnya dapat ditulis seperti berikut ini.
root@hhan:~# alias daftar=’ls –alt’
Go to link Download
Tuesday, June 13, 2017
Password recovery hostname changes in linux
Password recovery hostname changes in linux
So..it recently happened to me when I while messing with my system, i wrote a script to change root password & set it to expire in every 7 days & simultaneously making changes to hostname by setting it to a random value.. I queried my friend Raghu for inputs regarding it & got some interesting results,which I will be compiling here. This tutorial is intended for Linux newbies & would help them to get familiar with the enviornment. Actually, after 7 days what happened I tried to log in,& it always said "root password expired, please contact your administrator"..seems familiar ? well..here is how you can eradicate this.
( PS: Folks..if you think you are too dumb to do
that, there exists an automated "burn-the-cd-boot-&-forget-solution"
called KONBOOT which can reset Linux passwords if you care.. :D choose your pick )
I actually rebooted the system & once I reached grub,selected the kernel, I pressed "e".I proceeded to 2nd line of configuration & pressed "e" again.
After that, login as root & then proceed to move to /etc/shadow
you can see there is a "1" in last entry which sets the root account to expire. remove it such that it becomes
Once done, save the file & exit by pressing :wq! in vi. After that, boot into graphical mode by typing
Way 1
open console, & type
WAY 2
The second way deals with editing a file known as "network" located in /etc/sysconfig/network, navigate to it
WAY 3
The third way deals with "sysctl" command, which can be used to change the variable kernel.hostname. Start by checking its current value by typing
where MYHOST.TESTSITE.COM is your new hostname. All of this was scripted,tested in FEDORA 13 (2.6.34.6-47.fc13.i686) & written using Scrib Fire
.
I hope it was interesting :)
Like This post ? You can buy me a Beer :)
Posted by XERO. ALL RIGHTS RESERVED.
( PS: Folks..if you think you are too dumb to do
that, there exists an automated "burn-the-cd-boot-&-forget-solution"
called KONBOOT which can reset Linux passwords if you care.. :D choose your pick )
I actually rebooted the system & once I reached grub,selected the kernel, I pressed "e".I proceeded to 2nd line of configuration & pressed "e" again.
kernel /boot/vmlinuz-2.6.34.6-47.fc13.i686 roObviously, I edited the file by pressing "e" again & modifying it by typing "single" for invoking single user mode in Linux.
kernel /boot/vmlinuz-2.6.34.6-47.fc13.i686 ro singlePress "b" key to boot. Afterwards, you are given a prompt, please enter "passwd" command to reset root password.
After that, login as root & then proceed to move to /etc/shadow
[root@zion XERO]# cd /etc& check the entry for root,it should look similar to this
[root@zion etc]# vi shadow
root:$6$McKhE96JGhl$uIfjBcMrrrL2x8aJ17mATex8WNXVMvZXrsfqoOL.
CinR9W2C8VXVyt4W2yt4eAJ0tgNPU2Kftr1f/lcvDG.:14859:0:99999:7::1:
you can see there is a "1" in last entry which sets the root account to expire. remove it such that it becomes
root:$6$McKhE96JGhl$uIfjBcMrrrL2x8aJ17mATex8WNXVMvZXrsfqoOL.
CinR9W2C8VXVyt4W2yt4eAJ0tgNPU2Kftr1f/lcvDG.:14859:0:99999:7:::
Once done, save the file & exit by pressing :wq! in vi. After that, boot into graphical mode by typing
[root@zion XERO]# init 5login with your password."root" problem solved :) After wards..i found out that my hostname was changed..so, here are three easy ways to change your hostname on your will.
Way 1
open console, & type
[root@zion XERO]# hostnamenow you can reset hostname (for the given session) by typing -
NETWORKING=yes
HOSTNAME=hosty.test.com
[root@zion XERO]# hostname myhostname.mysite.comwhere myhostname.mysite.com is your new hostname.
WAY 2
The second way deals with editing a file known as "network" located in /etc/sysconfig/network, navigate to it
[root@zion XERO]# cd /etc/sysconfig/check the value of hostname in it
[root@zion sysconfig]# cat networktime to change it, go to vi & edit it.
NETWORKING=yes
HOSTNAME=hosty.test.com
[root@zion sysconfig]# vi networksaved the file..reboot & its done :)
NETWORKING=yes
HOSTNAME=myhost.testsite.com
~
~
~
:wq!
WAY 3
The third way deals with "sysctl" command, which can be used to change the variable kernel.hostname. Start by checking its current value by typing
[root@station3 sysconfig]# sysctl kernel.hostnameand to change it, enter
kernel.hostname = hosty.test.com
[root@station3 sysconfig]# sysctl kernel.hostname=MYHOST.TESTSITE.COM
where MYHOST.TESTSITE.COM is your new hostname. All of this was scripted,tested in FEDORA 13 (2.6.34.6-47.fc13.i686) & written using Scrib Fire
.
I hope it was interesting :)
Like This post ? You can buy me a Beer :)
Posted by XERO. ALL RIGHTS RESERVED.
Go to link Download
Tuesday, April 25, 2017
PCLinuxOS 2007 Cool Looking Linux Distribution
PCLinuxOS 2007 Cool Looking Linux Distribution
PCLinuxOS 2007 : Cool Looking Linux Distribution
Introduction: -
I have been user of Linux for over 8 years now the first Linux distribution i used was RedHat Linux 5.2 and since then have tried a number of different Linux distribution , but primarily i have sticked with Red Hat(Fedora) and now Ubuntu for serious work . Now Linux distribution over the years have matured a lot on desktop front right from early days when there wasnt even one descent package for Desktop work to present day case when Dell is selling Desktop Computers with Ubuntu Linux ,Things have surely changed a lot . Its the emergence of distributions like Ubuntu,Freespire(Linspire),PCLinuxOS and other Desktop Linux distros that have catalyzed the adoption(or at least emergence) of Desktop Linux and emergence of Desktop Linux Concept.
PCLinuxOS began as a fork of Mandriva Linux (Mandrake linux) four years back by Texstar and still has a number of features common with Mandriva Linux . It uses RPM package format and number of configuration wizards are similar to one used in Mandriva Linux . PCLinuxOS is considered one of the more user friendly desktop linux , now personally i havenever used PCLinuxOS there was a certain buzz surrounding the release of PCLinuxOS 2007 hence i decided to try it out.
Here is my review of PCLinuxOS 2007: -
Installation : -
The Live CD Image is around 700 Megabytes in size which compresses around 2GB of packages , it took me about 7 Hours to download on a 256KBps Connection .
Here are the links from which you can download PCLinuxOS 2007 : -
Torrent: http://linuxtracker.org/torrents-details.php?id=4143
Download mirrors: http://www.pclinuxos.com/index.php?option=com_ionfiles&Itemid=28
Once ISO images are downloaded i would recommend burning ISO at a speed of 10x or 12x , anyways once you have burned the ISO you can always check the integrity of the CD from the boot menu .
On booting from the Cd Rom , this is the boot menu that is presented , as you can see PCLinuxOS provides a number of different options of booting into PCLinuxOS.

PCLinuxOS Boot Menu

Now after about 4 minutes on my old laptop i was presented with the screen to chose keyboard configuration, Time Zone and Networking Configuration and stuff. Now This is one of the first thing i disliked configuring so many things ( ): ) every time you are booting the live cd.

Keyboard configuration screen
Anyways once configuration is over you are presented with beautiful log in screen , i have to admit i particularly like this black theme PCLinuxOS uses .
 Login Screen
Now once the entire KDE Desktop loads , what strikes one first is that desktop is very aesthetically organized and icons,boot screens , Themes are extremely User Friendly , UI is one of the primary thing that strikes computer beginners and PCLinuxOS does extremely well in this not only it is extremely user friendly but also extremely polished and professional .Overall the User Interface of PCLinuxOS is simple , clean and attractive unlike many other Linux Distributions that are just getting more and more complex . PCLinuxOS uses Diamond Plate metal theme as its default theme and uses KDE desktop version 3.5.6 as its default window manager .
 This is how PCLinuxOS Desktop Looks
Now the installation is extremely user friendly and is wizard based this is one area where Linux distribution have matured a lot over the years installation has become extremely user friendly . Now since i already had Partition created using Partition Magic i could not test the partition tool but it should work well .Entire installation took around 25 minutes on my laptop(Celeron 1.4Ghz 256Megabytes Ram ) .
After completing the installation strangely during configuring of GRUB PCLinuxOS did not autodetect Ubuntu Linux and Linux Mint that were already installed in my computer though it did detect Windows hence i had to manually edit menu.lst file of Grub boot loader to include menu option for Ubuntu and Linux Mint . Anyways once installation was over i restarted the computer and logged into my new PCLinuxOS and found these major packages installed by default with PCLinuxOS : -
 Amarok :-Rocking Music Management software
 The Movie Player
Now unlike some other Linux Distribution that dont include Multimedia Codecs , Java JRE or Macromedia Flash because of licensing restrictions or some other reasons . You dont have to worry about these things if you are using PCLinuxOS this should help someone who is new to Linux and moving from Windows to Linux . I have seen a number of my computer novice friends who do not have Internet Connection being frustrated as hell while using Ubuntu Linux unable to play their favorite audio/video files
Now i tried playing a number of different media files and most of them played flawlessly and ones that did not could be easily played by installing w32codecs whose installation isnt difficult. Since Flash was pre-installed i could easily watch videos on YouTube or Google Video , also since Java JRE was pre-installed Java Applets worked flawlessly in Firefox . Even divx files played without any additional installation of codecs . Overall PCLinuxOS multimedia support is among the best among different Linux Distributions . One of the most crucial aspects that make PCLinuxOS so Newbie friendly.
Here are the list of codecs PCLinuxOS supports(taken from wikipedia) :-
Application wise the distribution comes preloaded with most of the application a normal desktop user requires like Gimp-For graphics management , digikam-for photo management , Amarok for Music management and Playing , OpenOffice a really solid office suite comparable to Microsoft office , and other really cool applications .


PCLinuxOS provides easy way of configuring different aspects of the distribution using the PCLinuxOS control centre(System ->Configuration->Control Centre) . Now this Control Centre is similar to one that is shipped with Mandriva Linux.
 PCLinuxOS Control Centre
Now by default PCLinuxOS does not automatically enable 3D Effect (Beryl/Compiz) and can be enabled from Control Centre by going to Hardware and selecting Configure 3D Effect .
 Enabling 3D Effect in Control Center
Hardware support is also excellent in PCLinuxOS most of my hard ware was properly detected and i had no problem in using them from USB Pendrive to K750i phone everything worked fine .
Conclusion :-
Overall , PCLinuxOS is one of the finest Desktop Linux Distribution i have tried in past few years , it integrates some of the wonderful features of Mandriva Linux and adds a power pack collection of software in 700Megabytes of Live CD .With its extremely clean and attractive interface and ability to play multimedia files out of the box its one Linux Distribution that should not give Linux Newbies headache. I have been a passionate user of Ubuntu and i can safely say if i had to recommend a Linux distro to someone new at computers it wont be Ubuntu but PCLinuxOS .
PCLinuxOS Website : - http://www.pclinuxos.com/
Distrowatch page of PCLinuxOS : - http://distrowatch.com/table.php?distribution=pclinuxos
Article written by Ambuj Varshney(blogambuj(at)gmail.com)
For Linux On Desktop Blog(http://linuxondesktop.blogspot.com)
(C) 2007, Ambuj Varshney
I have been user of Linux for over 8 years now the first Linux distribution i used was RedHat Linux 5.2 and since then have tried a number of different Linux distribution , but primarily i have sticked with Red Hat(Fedora) and now Ubuntu for serious work . Now Linux distribution over the years have matured a lot on desktop front right from early days when there wasnt even one descent package for Desktop work to present day case when Dell is selling Desktop Computers with Ubuntu Linux ,Things have surely changed a lot . Its the emergence of distributions like Ubuntu,Freespire(Linspire),PCLinuxOS and other Desktop Linux distros that have catalyzed the adoption(or at least emergence) of Desktop Linux and emergence of Desktop Linux Concept.
PCLinuxOS began as a fork of Mandriva Linux (Mandrake linux) four years back by Texstar and still has a number of features common with Mandriva Linux . It uses RPM package format and number of configuration wizards are similar to one used in Mandriva Linux . PCLinuxOS is considered one of the more user friendly desktop linux , now personally i have
Here is my review of PCLinuxOS 2007: -
Installation : -
The Live CD Image is around 700 Megabytes in size which compresses around 2GB of packages , it took me about 7 Hours to download on a 256KBps Connection .
Here are the links from which you can download PCLinuxOS 2007 : -
Download mirrors: http://www.pclinuxos.com/index.php?option=com_ionfiles&Itemid=28
Once ISO images are downloaded i would recommend burning ISO at a speed of 10x or 12x , anyways once you have burned the ISO you can always check the integrity of the CD from the boot menu .
Login ScreenThis is how PCLinuxOS Desktop LooksAfter completing the installation strangely during configuring of GRUB PCLinuxOS did not autodetect Ubuntu Linux and Linux Mint that were already installed in my computer though it did detect Windows hence i had to manually edit menu.lst file of Grub boot loader to include menu option for Ubuntu and Linux Mint . Anyways once installation was over i restarted the computer and logged into my new PCLinuxOS and found these major packages installed by default with PCLinuxOS : -
- OpenOffice.org 2.2.0 Office Suite
- Mozilla Firefox 2.0.3 : - Default Web Browser in PCLinuxOS
- MPlayer 1.0rc1 : - The Movie Player for playing audio/video files
- Gimp 2.3.16 :- For Image Manipulation
- Thunderbird 2.0.0
- KDE Multimedia applications :- Amarok , Kaffine , K3b , and other applications
- Java JRE , Macromedia Flash , a number of Multimedia Codecs (w32codecs not included)
Amarok :-Rocking Music Management softwareThe Movie PlayerNow i tried playing a number of different media files and most of them played flawlessly and ones that did not could be easily played by installing w32codecs whose installation isnt difficult. Since Flash was pre-installed i could easily watch videos on YouTube or Google Video , also since Java JRE was pre-installed Java Applets worked flawlessly in Firefox . Even divx files played without any additional installation of codecs . Overall PCLinuxOS multimedia support is among the best among different Linux Distributions . One of the most crucial aspects that make PCLinuxOS so Newbie friendly.
Here are the list of codecs PCLinuxOS supports(taken from wikipedia) :-
PCLinuxOS can also play back proprietary multimedia files (wma, mp3, mpg, rm, mov, etc) by default, something that some Linux distributions cannot do without further user configuration, because of proprietary and ideological issues. However, the controversial libdvdcss library for DVD playback is not installed initially, but is available in the official software repository.Mozilla Firefox and Thuderbird are well integrated clicking on email link in Firefox opens up Thuderbird and clicking on web page address in Thuderbird opens up Mozilla Firefox .
Application wise the distribution comes preloaded with most of the application a normal desktop user requires like Gimp-For graphics management , digikam-for photo management , Amarok for Music management and Playing , OpenOffice a really solid office suite comparable to Microsoft office , and other really cool applications .
Various Screenshots showing installed applications in PCLinuxOS
PCLinuxOS provides easy way of configuring different aspects of the distribution using the PCLinuxOS control centre(System ->Configuration->Control Centre) . Now this Control Centre is similar to one that is shipped with Mandriva Linux.
PCLinuxOS Control CentreNow by default PCLinuxOS does not automatically enable 3D Effect (Beryl/Compiz) and can be enabled from Control Centre by going to Hardware and selecting Configure 3D Effect .
Enabling 3D Effect in Control CenterConclusion :-
Overall , PCLinuxOS is one of the finest Desktop Linux Distribution i have tried in past few years , it integrates some of the wonderful features of Mandriva Linux and adds a power pack collection of software in 700Megabytes of Live CD .With its extremely clean and attractive interface and ability to play multimedia files out of the box its one Linux Distribution that should not give Linux Newbies headache. I have been a passionate user of Ubuntu and i can safely say if i had to recommend a Linux distro to someone new at computers it wont be Ubuntu but PCLinuxOS .
PCLinuxOS Website : - http://www.pclinuxos.com/
Distrowatch page of PCLinuxOS : - http://distrowatch.com/table.php?distribution=pclinuxos
Article written by Ambuj Varshney(blogambuj(at)gmail.com)
For Linux On Desktop Blog(http://linuxondesktop.blogspot.com)
(C) 2007, Ambuj Varshney
Go to link Download
Friday, April 14, 2017
Puppy Linux A Linux distribution that runs completely on RAM
Puppy Linux A Linux distribution that runs completely on RAM
Puppy Linux : A Linux distribution that runs completely on RAM
Over years size of software along with processing power of computers have increased considerably , i still remember the first Linux distribution i used was Red Hat Linux 5.2 came on a single CD , now RHEL or Fedora comes on a DVD or 5-6 Cds , even Windows has grown tremendously in size , memory requirement have zoomed the latest Windows Vista requires almost 2GB of Ram and a fast processor to run flawlessly. Now here is a shocker Puppy Linux is a Linux distribution that is only 28-70 Megabytes in size and come fully featured Graphical Desktop with Web Browser , Word Processor , Download
According to Puppy Linux Website the goal of Puppy Linux is to create a Linux distribution that is user friendly , quick to run and include all the applications that user needs .
Installing puppy Linux is not all that difficult download the ISOs from their website and burn it on a cdrom now after this boot from the cdrom on booting puppy Linux it asks a number of questions regarding Hardware Configurations , Video Card and Monitor and stuff ,after completing these steps Puppy Linux boots into impressive graphical desktop in less than a minute . You dont have to enter these information everytime you boot they can be saved on hard-disk or USB Flash memory or burned on a cd so that you dont have to enter these information everytime you boot Puppy Linux . Now i have to admit i wasnt expecting such a good graphical environment on puppy Linux considering it is only 70 Megabytes in size . The user interface was extremely responsive helped by the fact it was running entirely on RAM and it wasnt accessing data from hard disk frequently which is significantly slower than accessing data from RAM .
Now Puppy Linux since aims to be a distribution for newbies so icons were very logically named write , draw , connect and other user friendly captions were provided for different programs , So that new Linux user dosent have any problem recognizing programs which he might have not seen earlier .
This is how Puppy Linux Desktop Looks : -

What is included ?
Some of the important Application that are included with Puppy Linux includes : -
1. Sea Monkey Web browser
2. AbiWord Word Processor
3. Ghostview PDF Viewer
4. Axel Download Accelator
5. Dillo Web browser
6. Gxine Media player
7. DVD Video ripper ( :) )
8. Gnumeric Spreadsheet Program
9. Inklite Vector Editor
10. mtPaint
11. A collection of small games
and other programs
Now i access Internet through LAN , i had no problem installing LAN on puppy Linux it provides a very useful graphical tool for configuring Internet connection through LAN or modem .

The Web Browser that is included with Puppy Linux is Sea Monkey which is based on Mozilla code base same as Mozilla Firefox. I Did not encounter any problem in using Internet through Sea Monkey most of the website rendered without any problem . Even Macromedia/Adobe Flash Extensions was installed by default this is really wonderful packing in fully functional web browser with Macromedia flash plug in along with other applications in 70 megabytes .
 Browsing Internet through Sea Monkey Web Browser
 Gnumeric : A Lightweight Spread Sheet program that is quite usable
 Media Utility Tool to Mount drives
Now Gxine in Puppy Linux comes with number of codecs though w32codecs package is not installed by default so some audio/video files may not play well but most of the popular ones did play without any problem i tried playing avi,mpg ,Video CDs and other files all played well with minor adjustments .
 Gxine : A Media Player included with Puppy Linux based on Xine Framework
Even though Puppy Linux comes with wide array of application you can install more application from puppys application repositories , Puppy Linux uses (.pup) files for applications and if you cannot find particular installation file you can also use debian packages for installing applications on Puppy using alien . Puppy Linux uses different file format for installing application since Puppy Linux is not based on any other Linux distribution but was created from scratch by Puppy Linux creator Barry Kauler.
If you are feeling bored there are collection of neat games that comes with puppy linux enabling you to have fun on puppy Linux .
 Classic Mine Sweeper game comes pre-installed with Puppy
 Drawing tool that come pre-installed with Puppy Linux
Article written by : -
Ambuj Varshney (blogambuj(at)gmail.com)
for Linux on Desktop , (C) 2007
Go to link Download
Monday, April 3, 2017
Pencipta Linux Acungkan Jari Tengah untuk Nvidia
Pencipta Linux Acungkan Jari Tengah untuk Nvidia
 Finlandia - Linus Torvalds terlihat sangat kesal terhadap Nvidia. Bahkan dalam sebuah kesempatan, penemu sistem operasi Linux itu mengacungkan jari tengahnya untuk Nvidia. Apa alasannya?
 Nama Torvalds memang sudah sangat dikenal di dunia open source. Namun tidak semua mengetahui jika ia ternyata sangat membenci Nvidia. Hal ini mulai terungkap saat ia menjadi pembicara forum untuk sebuah acara entrepreneur, di Otaniemi, Finlandia.
Salah satu peserta wanita mengangkat tangannya dan bertanya kepada Torvalds soal sulitnya membuat Linux berjalan sempurna di laptopnya yang menggunakan chip Nvidia Optimus. Padahal Nvidia merupakan penyumbang kartu grafis terbesar di ranah komputer.
"Saya sempat berharap bahwa Nvidia akan melakukan sesuatu, namun ternyata mereka tidak memberikan dukungan sama sekali (terhadap Linux-red.)," kata Torvalds, menanggapi pertanyaan peserta.
Torvalds yang memandang Nvidia ikut ambil keuntungan dari open source (Android) pun merasa kecewa, dan sudah sepantasnya jika raksasa micro chip itu menggelontorkan dukungan untuk Linux seperti yang sudah dilakukan di Windows dan Mac OS.
"So, Nvidia f*** you," tegas Torvalds, sembari mengacungkan jari tengahnya di depan kamera. Seperti dikutip detikINET dari cnet, Senin (18/6/2012).
Namun tak cuma Nvidia, Torvalds juga merasa perusahaan lain tidak melakukan dukungan yang cukup untuk Linux. Namun ia tak menyebutkan secara pasti perusahaan mana saja yang ia maksud.
Nvidia memang sudah menyediakan driver khusus Linux di situs utamanya, namun hal itu tetap tidak menyelesaikan isu seputar kompatibilitas komponen yang sudah berlangsung selama bertahun-tahun.
Tak seperti rivalnya AMD, Nvidia terlihat enggan merilis driver yang bersifat open source karena dianggap dapat membocorkan informasi penting di dalam produknya.
Berikut adalah sikap tegas Torvalds yang dapat dilihat pada menit ke 49:59
(eno/ash)
Sumber :
http://inet.detik.com/read/2012/06/18/130423/1943894/398/wah-bapak-linux-acungkan-jari-tengah-untuk-nvidia
Copyright : underdhol
Go to link Download
Panduan Cara Menginstall Linux Ubuntu 10 04 LTS
Panduan Cara Menginstall Linux Ubuntu 10 04 LTS
Panduan Cara Menginstall Linux Ubuntu 10.04 LTS - Saya akan berbagi bagaimana cara menginstall Linux Ubuntu 10.04 LTS (Lucid Lynx), Kenapa saya menjelaskan mengenai Cara install linux ubuntu? Karena banyak orang yang tidak mengetahui bagaimana cara menginstall dan menggunakan linux ubuntu tersebut. Berikut ini adalah panduan cara menginstall linux ubuntu 10.04 LTS:
Pertama masukkan CD Installer ke perangkat CD / DVD-ROM dan reboot komputer untuk boot dari CD.
Kedua pilih bahasa dan klik tombol "Install Ubuntu 10.04 LTS" untuk melanjutkan.
Ketiga tentukan lokasi, maka waktu sistem akan menyesuaikan. Setelah anda memilih lokasi Klik tombol "Forward".
Keempat pilih layout keyboard yang diinginkan. Jika sudah selesai konfigurasi keyboard Klik tombol "Forward". Di sini Anda mempunyai 4 macam pilihan:
Apabila pada komputer anda terdapat sistem operasi lain (misalnya Windows XP) dan Anda menginginkan sistem dual boot, pilih :
Pada layar ini, isi kolom dengan nama asli Anda, nama yang ingin Anda gunakan untuk login di OS Ubuntu (juga dikenal sebagai username yang digunakan untuk login ke sistem), password dan nama komputer (secara otomatis, tetapi bisa ditimpa).
Pada langkah ini juga terdapat sebuah opsi bernama "Login secara otomatis". Apabila Anda member centang pada kotak pada pilihan ini, maka Anda akan secara otomatis login ke desktop Ubuntu. Untuk melanjutkan klik Klik tombol "Forward".
Kelima klik tombol “Install”. Maka selanjutnya akan terinstall Ubuntu 10.04 LTS (Lucid Lynx). Tunggu proses beberapa menit (ini tergantung spesifikasi komputer), maka akan muncul sebuah jendela pop-up, yang akan memberitahukan bahwa proses instalasi selesai, dan untuk menggunakan sistem operasi Ubuntu yang baru diinstal anda harus me-restart komputer. Klik tombol "Restart Now".
CD yang anda gunakan untuk menginstall akan keluar secara otomatis dan tekan "Enter" untuk reboot. Dalam beberapa detik Komputer akan direstart, maka akan tampil boot splash Ubuntu.
Selanjutnya pada tampilan login, klik nama pengguna Anda kemudian masukan password Anda dan Klik "Log In" atau dapat juga menekan Enter.
Apabila pada komputer anda terdapat sistem operasi lain (misalnya Windows XP) dan Anda menginginkan sistem dual boot, pilih :
- Maksud dari pilihan ke-1 yaitu untuk Instal secara berdampingan, memilih di antara mereka pada setiap startup.
- Maksud dari Pilihan Ke-2 yaitu "Gunakan seluruh disk (Use entire disk)" maksudnya Apabila Anda menginginkan untuk menghapus sistem operasi yang sudah ada, atau hard drive telah kosong dan Anda menginginkan supaya installer secara otomatis mempartisi hard drive Anda.
- Maksud dari Pilihan Ke-3 yaitu "Gunakan ruang terbesar " dan akan menginstal Ubuntu 10.04 di ruang unpartitioned pada hard drive yang telah dipilih.
- Maksud dari Pilihan Ke-4 yaitu : "Tentukan partisi secara manual" dan hanya dianjurkan untuk pengguna tingkat lanjut, untuk memformat hard drive dengan filesystem lain dari yang default atau untuk membuat partisi khusus. Namun dapat juga digunakan untuk menciptakan partisi / home, yang sangat berguna jika Anda menginstal ulang seluruh sistem.
Pada layar ini, isi kolom dengan nama asli Anda, nama yang ingin Anda gunakan untuk login di OS Ubuntu (juga dikenal sebagai username yang digunakan untuk login ke sistem), password dan nama komputer (secara otomatis, tetapi bisa ditimpa).
Pada langkah ini juga terdapat sebuah opsi bernama "Login secara otomatis". Apabila Anda member centang pada kotak pada pilihan ini, maka Anda akan secara otomatis login ke desktop Ubuntu. Untuk melanjutkan klik Klik tombol "Forward".
Kelima klik tombol “Install”. Maka selanjutnya akan terinstall Ubuntu 10.04 LTS (Lucid Lynx). Tunggu proses beberapa menit (ini tergantung spesifikasi komputer), maka akan muncul sebuah jendela pop-up, yang akan memberitahukan bahwa proses instalasi selesai, dan untuk menggunakan sistem operasi Ubuntu yang baru diinstal anda harus me-restart komputer. Klik tombol "Restart Now".
CD yang anda gunakan untuk menginstall akan keluar secara otomatis dan tekan "Enter" untuk reboot. Dalam beberapa detik Komputer akan direstart, maka akan tampil boot splash Ubuntu.
Selanjutnya pada tampilan login, klik nama pengguna Anda kemudian masukan password Anda dan Klik "Log In" atau dapat juga menekan Enter.

Demikian Panduan Cara Menginstall Linux Ubuntu 10.04 LTS semoga bermanfaat. Jangan lupa nantikan panduan menginstal program komputer lainnya esok hari. Trims.
Go to link Download
Sunday, February 5, 2017
Playing Audio Video Files under Linux
Playing Audio Video Files under Linux
PLAYING AUDIO/VIDEO FILES ON LINUX
A large number of Linux Distributions these days including Fedora,Ubuntu,Kubuntu etc which have become quiet popular and are increasingly being accepted by the Desktop Users lack proper support for playing the popular Audio/Video Formats right out of the box mainly because of certain patent and royalty issue . The issue of no cross platform file compatibility has been robbing common users of ability to display files and this has been one of the major reason for slow adaption of Linux on the Desktop Front. The case isnt that the Linux dosent support these formats but is not intentionally added to the Linux distribution because of
Real Player
Playing Real Media(.rm) Files :-
Real Player has been available on the Unix/Linux platform since a number of years . The Current version of the realplayer available on linux is the RealPlayer 10 though not as feature rich or rich in user interface as one available on the windows platform but still very usable and does the job of playing audio/video files quiet well and can be obtained at the following address . http://www.real.com/linux?pcode=rn&am
Besides having ability to play the RealMedia(Audio and Video) (.rm,.ra,.rv,.rmvb) File , it can be used for playing mp3 files , (.3gpp) files popularly used in cellphone cameras , and the open source Audio format Ogg Vorbis(.ogg).
 The Linux Version of Popular Real Player
Playing mp3 files : -
Mp3 is one of the most widely used audio format around the world right now so it would be silly if Linux could not play mp3 .
A number of players exist for playing mp3 files :-
mpg123
This is command line based audio player that forms the backbone of number of graphically available Audio players , it is one of the most efficient player on the Linux platform and can play mp3 files on as low hardware specs as a 120Mhz Pentium Processor based computer . A similar command line application is mpg321 that can be used for playing mp3 files.
mpg123 or mpg321 file name - To play mp3 file
Ctrl + C - This skips to next track
Typing Ctrl + C Twice - quits the application
mpg123 -z *.mp3 : - Command would play all the mp3 files in the directory with a shuffled play-list.
mpg123 -w filename.wav filename.mp3 :- This command would convert the mp3 file to wav file , whic can then be used for burning on to cd to make audio cd.
However if your audio files/file is located in some location in sub-folders and u dont know exact location then following command can be used
mpg123 $ (find -name "Filename")
Website : - http://www.mpg123.de/
Website : - http://mpg321.sourceforge.net/
XMMS
This is the WinAmp alternative for the Linux platform and has been in existence for quiet some time now , it is based on mpg123 library for playing mp3 files . The application has look similar to winamp application and can be beautified with a number of skins , also XMMS supports a large number of plugins that add extra functionality to the player. Besides having ability to play mp3 files it can be used for plying WMA files also by installing external plugin.(http://mcmcc.bat.ru/xmms-wma/)Website : - http://www.xmms.org/
XINE
Xine is also one of the popular video playback engine , Xine is based upon xine-lib and uses external libraries to play popular audio/video files. Xine with external plugin can play popular Windows Media files, AVI,MPG,etc and can be used for playing VideoCD/DVD .It can be used for playing DVD movies with the use of external library livdvdcss ,though because of legal issues its use may be illegal in some places . Xine provides powerful API that can be used by other external application for playing Video files and Video processing . A Number of frontends exist for Xine including totem(Gnome) , Kaffeine (KDE) , xine-ui etc. Xine can play almost all popular file-formats by install extra w32codecs which are dll files used by xine for decoding popular media formats .
Here is the list of supported video codecs from the Xine website
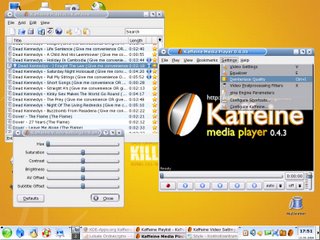 Kaffeine a popular video frontend to Xine on KDE
Video codecs supported
supported:o mpeg 1/2
o mpeg 4 (aka OpenDivX)
o ms mpeg 4
o divx 3/4/5
o windows media video 7 & 8
o motion jpeg
o Cinepak
o DV
o ms video 1 (msvc)
o ms rle
o Sorenson SVQ1/SVQ3 (often used in Quicktime trailers)
o creative yuv (cyuv)
o roq video
o QT RLE, SMC, RPZA
o theora
via external binary/win32 codecs (not included in xine):
o Indeo 3.1-5.0
o Window Media Video 8,9
o On2 VP3.1
o I263
o Real Media 2.0, 3.0, 4.0
currently unsupported/untested Formats:
o 3ivx
o h263 (aka Real Video 1.0)
File formats (System layer / media types)
supported:
* direct DVD playback (of unlocked/unencrypted DVDs, see below)
* Video CD
* Audio CD
* mpeg program streams (.mpg, .mpeg)
* mpeg transport streams (.ts)
* ogg (.ogg, .ogm)
* avi (.avi)
* asf (.asf, .wmv, .wma)
* quicktime (.mov, .mp4)
* mpeg-video (.mpv, .m2v)
* mpeg-audio (.mp2, .mp3)
* Sega Saturn FILM (.cpk)
* Id Software RoQ (.roq)
* wav (.wav)
* Autodesk FLIC (.fli)
* real (.rm, .ra, .ram)
* raw dv (.dv)
* network graphics format (.png, .mng)
* Creative Voice (.voc)
* Sun/NeXT SND/AU (.snd, .au)
* Wing Commander III (.mve)
* Westwood Studios files (.vqa, .aud)
* Electronic Arts WVE (.wve)
* AIFF (.aif, .aiff)
* YUV4MPEG2 (.y4m)
* SMJPEG (.mjpg)
* raw AC3 (.ac3)
* Dialogic VOX (.vox)
* TechnoTrend PVA (.pva)
* Playstation STR (.str)
* Nullsoft Video (.nsv)
* 4X Technologies (.4xm)
Audio codecs supported:
o mpeg audio (layer 1,2,3)o a/52 (aka ac3, dolby digital)
o aac (used in .mp4 files)
o dts (via external decoder)
o vorbis
o pcm
o adpcm (MS/IMA/DVI/Dialogic)
o mu-law and A-law
o roq dpcm
o Real Media dnet audio
o Real Media 28.8 audio
o DivX audio (WMA)
o GSM 6.10
o FLAC
o NSF (NES sound format)
o Speex
via external binary/win32 codecs (not included in xine):
o MS GSM
o Intel Music Coder
o Voxware Metasound
o ACELP.net
o Real Media Sipro/Cook/dnet
o QDesign Music 1/2 (QDM1/QDM2)
currently unsupported/untested Formats:
o some formats frequently found in quicktime streams (Qualcomm Pure Voice...)
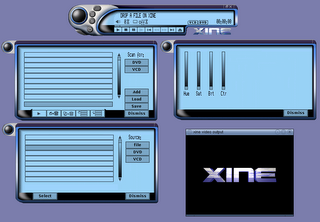 Xine with LCD Interface
Website : - http://xinehq.de/
MPlayer
MPlayer stands for Movie Player for Linux and is another popular video player for Linux platform . Besides being open source as most of the application under Linux are , it is available not only on Linux , But also on Windows,OS X etc. MPlayer is a command line based application for playing video files and a number of frontends exist for mplayer making it easier for newbies to play Media Files. The List of supported file formats is quiet similar to Xine as MPlayer also uses some of the library used by xine for decoding videos including w32codec pack.MPlayer website states that it can play damaged Video CDs, bad AVI files with damaged index properly though i was not able to confirm it. So this may be another plus for some with collection of old VCDs.
Another useful application included with Mplayer is mencoder which can convert one Mplayer playable format to another.
Some of the supported file formats are : - MPEG, VOB, AVI, OGG/OGM, VIVO, ASF/WMA/WMV, QT/MOV/MP4, FLI, RM, NuppelVideo, yuv4mpeg, FILM, RoQ, PVA, Matroska files, supported by many native, XAnim, RealPlayer, and Win32 DLL codecs. You can watch VideoCD, SVCD, DVD, 3ivx, RealMedia, Sorenson, Theora, and MPEG-4 (DivX) movies too.
Above list of supported file formats taken from mplayers website.
One of the common frontend for MPlayer is Gmplayer which is skinnable .
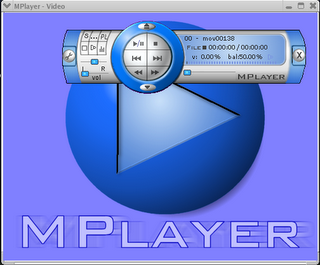 Gmplayer the graphical frontend to MPlayer
Website : - http://www.mplayerhq.hu/
Video Lan Player : VLC Player
VLC Player is another of popular video player available under Linux . It is released under GNU General Public license and is available for different platform including Windows,Linux,BeOS,Mac OS X etc. VLC player is based upon free open source libraries like libdvdcss,FFMpeg for decoding various video formats. Since both Xine and Mplayer are based upon FFmpeg file hence the list of supported codecs without installing extra files is almost same for all three players. One Important feature of VLC Player is its ability to play files over NetWork Protocols. The Frontend of VLC player is created using wxWidgets toolkit and its appearance can be changed by using different skins. One Popular feature of VLC Player is its ability to play files that are incomplete/broken or partially downloaded , making it useful for previewing file while downloading on file-sharing networks. Besides this another interesting feature of vlc player is its ability to play files contained inside iso image. This might prove useful if you have copy of a cd on your hard-disk and you want to play file without burning on the cd. Besides this another thing for which you can use VLC player is to play FLV files on Linux/Windows which are Flash Video files popularly used on video-sharing website like YouTube .
Website : - http://www.videolan.org/vlc/
iTunes alternative to linux : - Banshee and Rhythmbox
Banshee :- is a music player for Linux platform written on Mono,C# and uses Helix and GStreamer as a backend to play Ogg,MP3 and other formats . Besides having a user friendly interface it can be used for Syncing iPODs, importing music from cd . Besides having all these features its feature can be extended via adding external plugins since it has a nice plug-in architecture . Banshee is released under MIT License .
Rhythmbox : - Rhythmbox is gnome application based upon GStreamer architecture and has a similar interface to itunes. With SoundJuicer plugin it can import audio cds , it has ability to sync iPODs . It has support for Internet Radio . Besides all the features being a gnome application it integrates with gnome quiet nicely . Some of the popular plugins are :-
Gaim-RhythmBox : - Shows song information for currently playing song in the Gaim instant messenger .
BlueRemote : - Allows controlling of rhythmbox from a blue tooth enabled phones .
FoxyTune : - Allows controlling of rhythmbox application from Mozilla FireFox browser without leaving the browser .
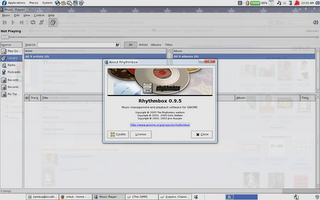 Rhythmbox running on FC 6
Website : - http://www.gnome.org/projects/rhythmbox/
Website : - http://www.banshee-project.org/
Article written by Ambuj Varshney<>
(C) 2007 Ambuj Varshney
Go to link Download
Thursday, October 27, 2016
Penjelasan Lengkap Tentang Organisasi File Pada Linux
Penjelasan Lengkap Tentang Organisasi File Pada Linux
File system adalah metode dan struktur data yang digunakan untuk memelihara file-file pada sebuah disk atau partisi agar tetap berada pada tracknya. Linux mendukung beberapa filesystem, diantaranya adalah sebagai berikut :
- minix filesystem lama, memiliki fitur yang sangat sedikit (kadang-kadang timestamp/pananda waktu hilang pada filename yang terdiri lebih dari 30 karakter ).
- xia versi modifikasi dari filesystem minix yang memperbaiki keterbatasan pada filename dan ukuran filesystem dari minix, filesystem xia tidak memperkenalkan fitur baru. Filesystem xia sangat tidak popular, tetapi dilaporkan bekerja dengan sangat baik.
- ext2 didesign untuk kompatibilitas pada filesystem berikutnya yang akan datang.
- ext versi lama dari ext2.
- msdos kompatibel dengan ms-dos (dan OS/2 dan Windows NT) FAT Filesystem.
- usmdos pengembangan dari msdos filesystem pada linux untuk mendapatkan beberapa fitur seperti filename yang panjang, owners, permissions, links, dan file-file devices.
- Iso9660 filesystem CD-ROM standar.
- nfs network file system (file system jaringan) yang mengijinkan sharing filesystem diantara beberapa computer sehingga memudahkan ijin akses filesystem.
- hpfs OS/2 filesystem.
- sysv SystemV/386, Coherent, and Xenix filesystems.
Susunan direktori pada unix secara umum adalah seperti berikut ini :
[caption id="attachment_724" align="alignnone" width="168" caption="susunan direktori unix (Wirzenius, 1998: P.20)"]
 [/caption]
- Root filesystem spesifik untuk tiap-tiap mesin dan berisi file-file yang dibutuhkan untuk melakukan booting. Biasanya juga berisi tool untuk melakukan perbaikan pada system yang rusak, dan juga untuk recovery file backup yang hilang.
- /usr berisi commands/perintah-perintah konsole, libraries, dan manual.
- /var berisi file-file yang berubah setiap saat, seperti direktori spool (untuk mail, news, printer, dsb), log files, formatted manual pages, temporary files.
- /home berisi file-file dari user yang bersangkutan.
- /bin bersisi command yang dapat dipakai selama bootup yang mungkin dibutuhkan oleh normal user.
- /sbin seperti /bin tetapi tidak untuk normal user, meskipun mungkin mereka diijinkan untuk menggunakanya.
- /etc berisi file-file konfigurasi.
- /root home direktori untuk user root.
- /lib shared libraries yang dibutuhkan oleh program pada root filesystem.
- /lib/modules loadable kernel modules.
- /dev file-file device.
- /tmp file-file temporary.
- /boot file-file yang dibutuhkan oleh loader seperti grub ataupun LILO.
- /mnt file-file yang digunakan untuk tujuan mounting oleh administrator system.
Tipe-Tipe File Pada System Operasi Linux
Terdapat beberapa tipe file dalam system operasi linux, diantaranya adalah sebagai berikut :
- File teks
File yang tersusun dalam format standart ASCII.
- File teks perintah
File yang tersusun dalam format sekumpulan perintah/script
- Directory
Sebuah direktori dapat berisi file-file dalam format apa saja.
Tanda “/” menunjukan direktori root.
Tanda “./” menunjukan direktorinya sendiri yang saat ini sedang aktif.
Tanda “../” menunjukan pada parent directory (directory diatasnya) .
- Link
Tipe link terbagi menjadi dua, yaitu hard link dan soft link (symbolic link). Hard link dapat dikatakan bukan merupakan tipe sebuah file tetapi merupakan nama lain dari sebuah file tertentu. Suatu file minimal memiliki satu link, yaitu nama file pertama kali filet tersebut dibuat. Sedangkan soft link (symbolic link) adalah sebuah link yang menghubungkan kepada suatu file dengan menunjuk kepada nama file tersebut. File tipe ini berisi pathname dari file yang ditunjuk.
- Device driver
Device driver terbagi menjadi dua, yaitu : block device dan character device.
Block Device Dan Character Device
Sistem operasi Linux ataupun Unix sedikit berbeda dengan system opersi Windows dalam menangani sebuah device. Pada system operasi Linux ataupun Unix semua device dianggap sebagai sebuah file, sehingga drive-drive seperti floppy disk, harddisk, CDROM, dll. tidak tampak. File-file kusus yang merupakan symbol dari device-device tersebut tersimpan pada directory /dev, device-device tersebut dapat berupa block device ataupun character device.
Character device adalah serangkain karakter yang dibaca berurutan misalnya serangkaian karakter yang kita tekan dari keyboard atau serangkaian data byte yang dikirim berurutan melalui serial line. Sedangkan block device atau sering disebut random access device adalah alat yang dapat menyimpan data dan menawarkan akses keseluruh bagian secara acak. Hard disk dan disket merupakan contoh dari block device. Dengan menggunakan hard disk kita dapat mengakses data yang tersimpan secara acak sedangkan bila menggunakan serial line misalnya, kita hanya dapat mengakses data sesuai urutannya.
Masing-masing device node memiliki major dan minor number device. Major number memberitahu kernel, device apa yang mewakili node tersebut. Misalnya major number 3 adalah IDE hard disk dan major number 8 adalah SCSI disk. Minor number mewakili nomor partisi, minor number 0 adalah keseluruhan hard disk yang pertama dan minor number 1 hingga 15 adalah partisi yang mungkin bisa dibuat di hard disk tersebut. Sebagai contoh misalnya terdapat 2 buah IDE hard disk maka hard disk pertama adalah /dev/hda dan hard disk kedua adalah /dev/hdb. Jika masing-masing hard disk tersebut memiliki 2 buah partisi maka kita memiliki /dev/hda1, /dev/hda2, /dev/hdb1 dan /dev/hdb2.
root@hhan:~# ls -l --sort=none /dev/hd[ab]{?,??}
brw-rw---- 1 root disk 3, 1 Jun 21 2005 /dev/hda1
brw-rw---- 1 root disk 3, 2 Jun 21 2005 /dev/hda2
brw-rw---- 1 root disk 3, 3 Jun 21 2005 /dev/hda3
brw-rw---- 1 root disk 3, 4 Jun 21 2005 /dev/hda4
brw-rw---- 1 root disk 3, 5 Jun 21 2005 /dev/hda5
brw-rw---- 1 root disk 3, 6 Jun 21 2005 /dev/hda6
brw-rw---- 1 root disk 3, 7 Jun 21 2005 /dev/hda7
brw-rw---- 1 root disk 3, 8 Jun 21 2005 /dev/hda8
brw-rw---- 1 root disk 3, 9 Jun 21 2005 /dev/hda9
brw-rw---- 1 root disk 3, 65 Jun 21 2005 /dev/hdb1
brw-rw---- 1 root disk 3, 66 Jun 21 2005 /dev/hdb2
brw-rw---- 1 root disk 3, 67 Jun 21 2005 /dev/hdb3
brw-rw---- 1 root disk 3, 68 Jun 21 2005 /dev/hdb4
brw-rw---- 1 root disk 3, 69 Jun 21 2005 /dev/hdb5
brw-rw---- 1 root disk 3, 70 Jun 21 2005 /dev/hdb6
brw-rw---- 1 root disk 3, 71 Jun 21 2005 /dev/hdb7
brw-rw---- 1 root disk 3, 72 Jun 21 2005 /dev/hdb8
brw-rw---- 1 root disk 3, 73 Jun 21 2005 /dev/hdb9
brw-rw---- 1 root disk 3, 10 Jun 21 2005 /dev/hda10
brw-rw---- 1 root disk 3, 11 Jun 21 2005 /dev/hda11
brw-rw---- 1 root disk 3, 12 Jun 21 2005 /dev/hda12
brw-rw---- 1 root disk 3, 13 Jun 21 2005 /dev/hda13
brw-rw---- 1 root disk 3, 14 Jun 21 2005 /dev/hda14
brw-rw---- 1 root disk 3, 15 Jun 21 2005 /dev/hda15
brw-rw---- 1 root disk 3, 16 Jun 21 2005 /dev/hda16
brw-rw---- 1 root disk 3, 17 Jun 21 2005 /dev/hda17
brw-rw---- 1 root disk 3, 18 Jun 21 2005 /dev/hda18
brw-rw---- 1 root disk 3, 19 Jun 21 2005 /dev/hda19
brw-rw---- 1 root disk 3, 20 Jun 21 2005 /dev/hda20
brw-rw---- 1 root disk 3, 21 Jun 21 2005 /dev/hda21
brw-rw---- 1 root disk 3, 75 Jun 21 2005 /dev/hdb11
brw-rw---- 1 root disk 3, 76 Jun 21 2005 /dev/hdb12
brw-rw---- 1 root disk 3, 77 Jun 21 2005 /dev/hdb13
brw-rw---- 1 root disk 3, 78 Jun 21 2005 /dev/hdb14
brw-rw---- 1 root disk 3, 79 Jun 21 2005 /dev/hdb15
brw-rw---- 1 root disk 3, 80 Jun 21 2005 /dev/hdb16
brw-rw---- 1 root disk 3, 81 Jun 21 2005 /dev/hdb17
brw-rw---- 1 root disk 3, 82 Jun 21 2005 /dev/hdb18
brw-rw---- 1 root disk 3, 83 Jun 21 2005 /dev/hdb19
brw-rw---- 1 root disk 3, 84 Jun 21 2005 /dev/hdb20
Huruf b pada bagian awal tersebut merupakan sebuah tanda jika file tersebut termasuk file bertipe block device, sedangkan jika file tersebut merupakan sebuah file bertipe character device maka akan diberi tanda c pada bagian awalnya.
Go to link Download
Tuesday, October 18, 2016
PORTSENTRY SEBAGAI PINTU KEAMANAN JARINGAN ANDA DAN KONFIGURASI NYA DI LINUX UBUNTU
PORTSENTRY SEBAGAI PINTU KEAMANAN JARINGAN ANDA DAN KONFIGURASI NYA DI LINUX UBUNTU

SERVER LINUX DAN KONFIGURASI PORTSENTRY
Yang di bahas disini adalah bagaimana caranya mengamankan server liux dengan menggunakan portsentry. Program ini bersifart gratis yang memiliki licensi GPL. Portsenty merupakan tools yang digunakan untuk menghindari berbagai aktifitas scaning oleh hacker ataupun semacamnya. Portsentry akan membuat server kita seolah-olah menghilang bila terjadi aktifitas scaning dan juga dapat memblok ip address hacker tersebut.
Berikut konfigurasi nya, hal ini saya lakukan dengan menggunakan mesin ubuntu 10.10
install terlebih dahulu portsentry
#apt-get install portsentry
setelah terinstall lakukan sedikit perubahan
#nano /etc/portsentry/portsentry.conf
cari baris
#BLOCK_UDP="1"
#BLOCK_TCP="1"
ubah menjadi
BLOCK_UDP="1"
BLOCK_TCP="1"
dan pastikan pada baris berikut ini aktif
KILL_Route=”/sbin/route add -host $TARGET$ reject”
kemudian aktifkan portsentry
#/etc/init.d/portsentry start
untuk melihat ip target yang melakukan scaning atau ip yang di blokir
#tail -f /var/log/syslog
#tail -f /etc/hosts.deny
Dan untuk membuka ip yang diblokir oleh portsentry adalah membuang ip scanner (ip Yang terbokir) dari /etc/hosts.deny
Restart service portsentry nya
#/etc/init.d/portsentry stop
#/etc/init.d/portsentry start
Jika ingin membut whitelist (ip yang diabaikan oleh portsentry) dapat memasukan ip nya kedalam file yang ada pada :
/etc/portsentry/portsentry.ignore
untuk melakukan scaning ip nya dapat menggunakan nmap
Special thanks to all master ubuntu
By : Agus Wiana
Go to link Download
Thursday, September 22, 2016
PART 2 PERINTAH PERINTAH DASAR LINUX BESERTA PENJELASAN DAN CARA PEMAKAIANLENGKAPNYA
PART 2 PERINTAH PERINTAH DASAR LINUX BESERTA PENJELASAN DAN CARA PEMAKAIANLENGKAPNYA
- Mematikan Sebuah Proses
Untuk mematikan sebuah proses yang sedang berjalan kita dapat menggunakan perintah kill. Penulisanya seperti berikut
root@hhan:~# kill
PID merupakan no urut dari suatu proses yang sedang berjalan. Untuk melihat PID suatu proses dapat dilakukan dengan perintah ps aux yang akan dibahas nantinya. Misalkan dari hasil menjalankan perintah ps aux diketahui sebagai berikut :
hhan 3376 0.0 4.0 23336 10384 ? S 20:15 0:00 kdeinit: kio_file file /tmp/ksocket-h
hhan 3392 0.5 7.0 29380 18100 ? S 20:15 0:01 kdeinit: kwrite /mnt/hda5/TakeThePoin
hhan 3394 0.1 5.4 25564 14024 ? S 20:15 0:00 kdeinit: kio_uiserver
hhan 3395 0.0 4.0 23068 10320 ? S 20:15 0:00 kdeinit: kio_file file /tmp/ksocket-h
hhan 3399 0.0 4.6 24176 11936 ? SN 20:16 0:00 kdeinit: kio_thumbnail thumbnail /tmp
root 3438 4.1 2.6 32316 6760 pts/1 Sl 20:19 0:00 xmms
root 3441 0.0 0.3 2564 856 pts/1 R+ 20:19 0:00 ps aux
Dari daftar diatas terlihat bahwa xmms memiliki PID 3438, maka untuk mematikan prosesnya dapat digunakan perintah seperti berikut ini :
root@hhan:~# kill 3438
- Perintah “mesg”
Perintah yang digunakan untuk memberikan ijin user lain menampilkan pesan dilayar terminal kita. Penulisanya sebagai berikut:
hhan@hhan:~$ mesg y
atau
hhan@hhan:~$ mesg n
Option y berarti ijin menulis pada terminal anda diijinkan, sedangkan option n berarti sebaliknya yaitu ijin menulis pada terminal anda tidak diijinkan untuk user lain.
- Perintah “talk”
Digunakan untuk mengadakan percakapan melalui terminal, input dari terminal anda akan disalin di terminal user lain, begitu juga sebaliknya, aplikasi ini menyerupai chatting. Untuk menjalankanya perintahnya adalah sebagai berikut :
hhan@hhan:~$ talk ID_tujuan@IP_tujuan
ID_tujuan merupakan user name pada komputer yang ingin dituju.
IP_tujuan merupakan alamat IP dari komputer yang ingin dituju.
Jadi misalkan anda ingin mengadakan percakapan pada user “orochimaru” yang memiliki IP 192.168.0.123 maka perintahnya akan seperti berikut ini.
hhan@hhan:~$ talk orochimaru@192.168.0.123
- Perintah “more”
Perintah yang digunakan untuk menampilkan is file layar perlayar.
hhan@hhan:~$ more
Perintah ini akan menmpilkan isi file layar per layar, untuk melakukan scroll dapat menggunakan tombol page down dan page up. Misal kita ingin melihat isi file /etc/fstab , maka perintahnya adalah sebagai berikut :
root@hhan:~# more /etc/fstab
- Melakukan Back Up File
Perintah cp digunakan untuk meng-copy suatu file pada suatu direktori tertentu, penggunakan perintahnya adalah seperti berikut:
hhan@hhan:~$ cp hhan.txt hhan_copy.txt
Arti dari perintah diatas adalah copy file dengan nama “hhan.txt” ke direktori yang saat itu sedang aktif dengan nama “hhan_copy.txt”.
- Perintah “ls”
Digunakan untuk melihat isi dari sebuah direktori secara lengkap dengan atribut–atributanya. Penggunakan perintahnya adalah seperti berikut ini:
hhan@hhan:~$ ls –alt
drwxr-xr-x 4 root root 4096 Apr 23 21:27 home
Arti dari hasil perintah diatas adalah sebagai berikut :
- drwxr-xr-x = mode file
d : directory
r : read
w: write
x : execute
- : tidak mempunyai hak
- 4 = jumlah link (jumlah file didalamnya)
- root = owner atau group.
root yang pertama menunjukan owner dan root yang kedua menunjukan groupnya.
- 4096 = ukuran file
- Apr 2321_27= tanggal dan waktu modifikasi
- Home = nama file
- Perintah “rpm”
rpm (Redhat Package Manager), digunakan untuk maintenance paket – paket yang telah ataupun ingin kita instal. Perintah ini merupakan perintah standart untuk linux red hat, untuk distro linux yang lain belum tentu perintah ini ada. Penggunakan perintah rpm adalah seperti berikut:
root@hhan:~# rpm –e kdepim-devel-3.1.4-1
Perintah diatas akan meng-uninstall paket dengan nama “kdepim-devel-3.1.4-1”.
Untuk meng-install paket dengan nama kdepim-devel-3.1.4-1.tgz perintahnya adalah seperti berikut ini:
root@hhan:~# rpm –ivh kdepim-devel-3.1.4-1.tgz
- Perintah “smbmount”
Perintah smbmount digunakan untuk memounting file sharing, penggunakan perintahnya adalah seperti berikut ini:
root@hhan:~# smbmount //hhan/sharingku /mnt/net
Go to link Download
Subscribe to:
Posts (Atom)