Saturday, June 10, 2017
Populate Records in ListView Android database SQLite p4
Populate Records in ListView Android database SQLite p4
For this exercise, we will be working with and offline database, which has a table name fstmdirektori (stafid, nama, jbt, telefon, emel).
Code is here - http://khirulnizam.com/android/FSTMDirektori.zip
Step 1: Create a new blank Android project, let say named FSTM Direktori.

Step 2: Add ListView in the main screen.

This is the main XML layout file.
activity_display_list.xml
<RelativeLayout >="http://schemas.android.com/apk/res/android"
 >="http://schemas.android.com/tools"
 android:layout_width="match_parent"
 android:layout_height="match_parent"
 android:background="#B58897"
 android:gravity="center_horizontal" >

 <View
 android:id="@+id/a"
 android:layout_width="match_parent"
 android:layout_height="1dp"
 android:background="#8DB3E1" />

 <ListView
 android:id="@+id/List"
 android:layout_width="match_parent"
 android:layout_height="match_parent"
 android:layout_below="@+id/a"
 android:divider="#8DB3E1"
 android:dividerHeight="2dp" />

</RelativeLayout>
Step 3: Add another layout XML file to hold each record, which will contain staffid, full name and the department (displaying three fields only).
Right-click on layout folder (as in picture below) and select New->Android XML File.

Use listcell.xml in the new XML file.

listcell.xml
<LinearLayout >="http://schemas.android.com/apk/res/android"
 >="http://schemas.android.com/tools"
 android:layout_width="match_parent"
 android:layout_height="match_parent"
 android:background="#F3CAE5"
 android:gravity="center_vertical"
 android:orientation="horizontal"
 android:padding="8dp" >

 <TextView
 android:id="@+id/txtstafid"
 android:layout_width="0dp"
 android:layout_height="wrap_content"
 android:layout_weight="1"
 android:textColor="#000" />

 <TextView
 android:id="@+id/txtnama"
 android:layout_width="0dp"
 android:layout_height="wrap_content"
 android:layout_weight="2"
 android:textColor="#000" />

 <TextView
 android:id="@+id/txtjbt"
 android:layout_width="0dp"
 android:layout_height="wrap_content"
 android:layout_weight="2"
 android:textColor="#000" />


</LinearLayout>
Step 4: The Java codes
Add the DBHelper class.
The DBHelper class is the class to create the offline database in the Android device. This facilities is supported by SQLite library available in Android OS.
Right click the package icon in the SRC folder, and add a new class.

DBHelper.java
package net.kerul.fstmdirektori;

import android.content.Context;
import android.database.sqlite.SQLiteDatabase;
import android.database.sqlite.SQLiteOpenHelper;

public class DBHelper extends SQLiteOpenHelper {
 //define all the constants
 static String DATABASE_NAME="fstmdirektori";
 public static final String TABLE_NAME="staflist";
 //these are the lit of fields in the table
 public static final String STAFID="stafid";
 public static final String NAMA="namapenuh";
 public static final String JBT="jabatan";
 public static final String TELEFON="telefon";
 public static final String EMEL="emel";

 public DBHelper(Context context) {
 //create the database
 super(context, DATABASE_NAME, null, 1);

 }

 @Override
 public void onCreate(SQLiteDatabase db) {
 //create the table
 String CREATE_TABLE="CREATE TABLE "+TABLE_NAME+" ("+STAFID+" INTEGER PRIMARY KEY, "+NAMA+" TEXT, "+JBT+" TEXT, "+TELEFON+" TEXT,"+EMEL+" TEXT)";
 db.execSQL(CREATE_TABLE);
 //populate dummy data
 db.execSQL("INSERT INTO staflist (stafid, namapenuh, jabatan, telefon, emel) VALUES(1, Khirulnizam Abd Rahman, JSK,0129034614, khirulnizam@gmail.com);");
 db.execSQL("INSERT INTO staflist (stafid, namapenuh, jabatan, telefon, emel) VALUES(2, Noorazli Masrop, JMM,01297324378, noorazli@kuis.edu.my);");
 db.execSQL("INSERT INTO staflist (stafid, namapenuh, jabatan, telefon, emel) VALUES(3, Muhammad Luqman, JSK,0112345423, luke@kuis.edu.my);");
 db.execSQL("INSERT INTO staflist (stafid, namapenuh, jabatan, telefon, emel) VALUES(4, Hasnuddin Hasnol, JMM,0112314233, din@kuis.edu.my);");
 db.execSQL("INSERT INTO staflist (stafid, namapenuh, jabatan, telefon, emel) VALUES(5, Muizz Salleh, JMM,0129787867, muizz@kuis.edu.my);");
 db.execSQL("INSERT INTO staflist (stafid, namapenuh, jabatan, telefon, emel) VALUES(6, Muna Sabah, JSK,0134234343, moon@kuis.edu.my);");

 }

 @Override
 public void onUpgrade(SQLiteDatabase db, int oldVersion, int newVersion) {
 //onUpgrade remove the existing table, and recreate and populate new data
 db.execSQL("DROP TABLE IF EXISTS "+TABLE_NAME);
 onCreate(db);

 }

}
Add another class called the DisplayAdapter. This class will act as the container to display each record from the database.
DisplayAdapter.java
package net.kerul.fstmdirektori;

import java.util.ArrayList;

import android.content.Context;
import android.view.LayoutInflater;
import android.view.View;
import android.view.ViewGroup;
import android.widget.BaseAdapter;
import android.widget.TextView;

public class DisplayAdapter extends BaseAdapter {
 private Context mContext;
 //list fields to be displayed
 private ArrayList<String> stafid;
 private ArrayList<String> nama;
 private ArrayList<String> jbt;


 public DisplayAdapter(Context c, ArrayList<String> stafid, ArrayList<String> nama, ArrayList<String> jbt) {
 this.mContext = c;
 //transfer content from database to temporary memory
 this.stafid = stafid;
 this.nama = nama;
 this.jbt = jbt;
 }

 public int getCount() {
 // TODO Auto-generated method stub
 return stafid.size();
 }

 public Object getItem(int position) {
 // TODO Auto-generated method stub
 return null;
 }

 public long getItemId(int position) {
 // TODO Auto-generated method stub
 return 0;
 }

 public View getView(int pos, View child, ViewGroup parent) {
 Holder mHolder;
 LayoutInflater layoutInflater;
 if (child == null) {
 layoutInflater = (LayoutInflater) mContext.getSystemService(Context.LAYOUT_INFLATER_SERVICE);
 child = layoutInflater.inflate(R.layout.listcell, null);
 mHolder = new Holder();

 //link to TextView
 mHolder.txtstafid = (TextView) child.findViewById(R.id.txtstafid);
 mHolder.txtnama = (TextView) child.findViewById(R.id.txtnama);
 mHolder.txtjbt = (TextView) child.findViewById(R.id.txtjbt);
 child.setTag(mHolder);
 } else {
 mHolder = (Holder) child.getTag();
 }
 //transfer to TextView in screen
 mHolder.txtstafid.setText(stafid.get(pos));
 mHolder.txtnama.setText(nama.get(pos));
 mHolder.txtjbt.setText(jbt.get(pos));


 return child;
 }

 public class Holder {
 TextView txtstafid;
 TextView txtnama;
 TextView txtjbt;
 }

}
And the main class – DisplayList.java that trying to display all records in the screen.
DisplayList.java
package net.kerul.fstmdirektori;

import java.util.ArrayList;

import android.app.Activity;
import android.app.AlertDialog;
import android.content.DialogInterface;
import android.content.Intent;
import android.database.Cursor;
import android.database.sqlite.SQLiteDatabase;
import android.os.Bundle;
import android.view.Menu;
import android.view.View;
import android.view.View.OnClickListener;
import android.widget.AdapterView;
import android.widget.AdapterView.OnItemClickListener;
import android.widget.AdapterView.OnItemLongClickListener;
import android.widget.ListView;
import android.widget.Toast;

public class DisplayList extends Activity {

 private DBHelper mHelper;
 private SQLiteDatabase dataBase;

 //variables to hold staff records
 private ArrayList<String> stafid = new ArrayList<String>();
 private ArrayList<String> nama = new ArrayList<String>();
 private ArrayList<String> jbt = new ArrayList<String>();

 private ListView userList;
 private AlertDialog.Builder build;

 @Override
 public void onCreate(Bundle savedInstanceState) {
 super.onCreate(savedInstanceState);
 setContentView(R.layout.activity_display_list);

 userList = (ListView) findViewById(R.id.List);

 mHelper = new DBHelper(this);


 }

 @Override
 protected void onResume() {
 //refresh data for screen is invoked/displayed
 displayData();
 super.onResume();
 }

 /**
 * displays data from SQLite
 */
 private void displayData() {
 dataBase = mHelper.getWritableDatabase();
 //the SQL command to fetched all records from the table
 Cursor mCursor = dataBase.rawQuery("SELECT * FROM "
 + DBHelper.TABLE_NAME, null);

 //reset variables
 stafid.clear();
 nama.clear();
 jbt.clear();

 //fetch each record
 if (mCursor.moveToFirst()) {
 do {
 //get data from field
 stafid.add(mCursor.getString(mCursor.getColumnIndex(DBHelper.STAFID)));
 nama.add(mCursor.getString(mCursor.getColumnIndex(DBHelper.NAMA)));
 jbt.add(mCursor.getString(mCursor.getColumnIndex(DBHelper.JBT)));

 } while (mCursor.moveToNext());
 //do above till data exhausted
 }

 //display to screen
 DisplayAdapter disadpt = new DisplayAdapter(DisplayList.this, stafid, nama, jbt);
 userList.setAdapter(disadpt);
 mCursor.close();
 }//end displayData


 @Override
 public boolean onCreateOptionsMenu(Menu menu) {
 // Inflate the menu; this adds items to the action bar if it is present.
 getMenuInflater().inflate(R.menu.display_list, menu);
 return true;
 }

}
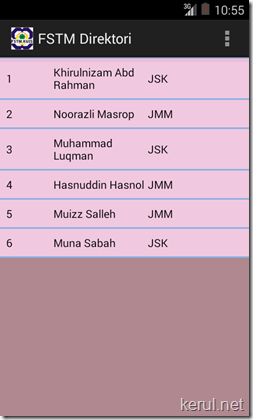
Try RUN the project and you might see the Output as below.

Code is here - http://khirulnizam.com/android/FSTMDirektori.zip
Next tutorial –> View Complete Record from ListView
Go to link Download

Thursday, December 1, 2016
Program VB Net 2008 untuk Menambah Record pada Tabel Database MySQL
Program VB Net 2008 untuk Menambah Record pada Tabel Database MySQL
Nah, pada postingan artikel kali ini akan membahas bagaimana menambah record pada tabel database MySQL dengan program VB.Net 2008 .
Langsung aja kita bahas program VB Net 2008 berikut sesuai judul tersebut di atas.
Desain Form seperti berikut :

Coding Program :
Baca juga artikel lain tentang Visual Basic Net 2008
sumber:http://suwandanas.blogspot.com/2013/03/program-vbnet-2008-untuk-menambah.html#more
Go to link Download